In short
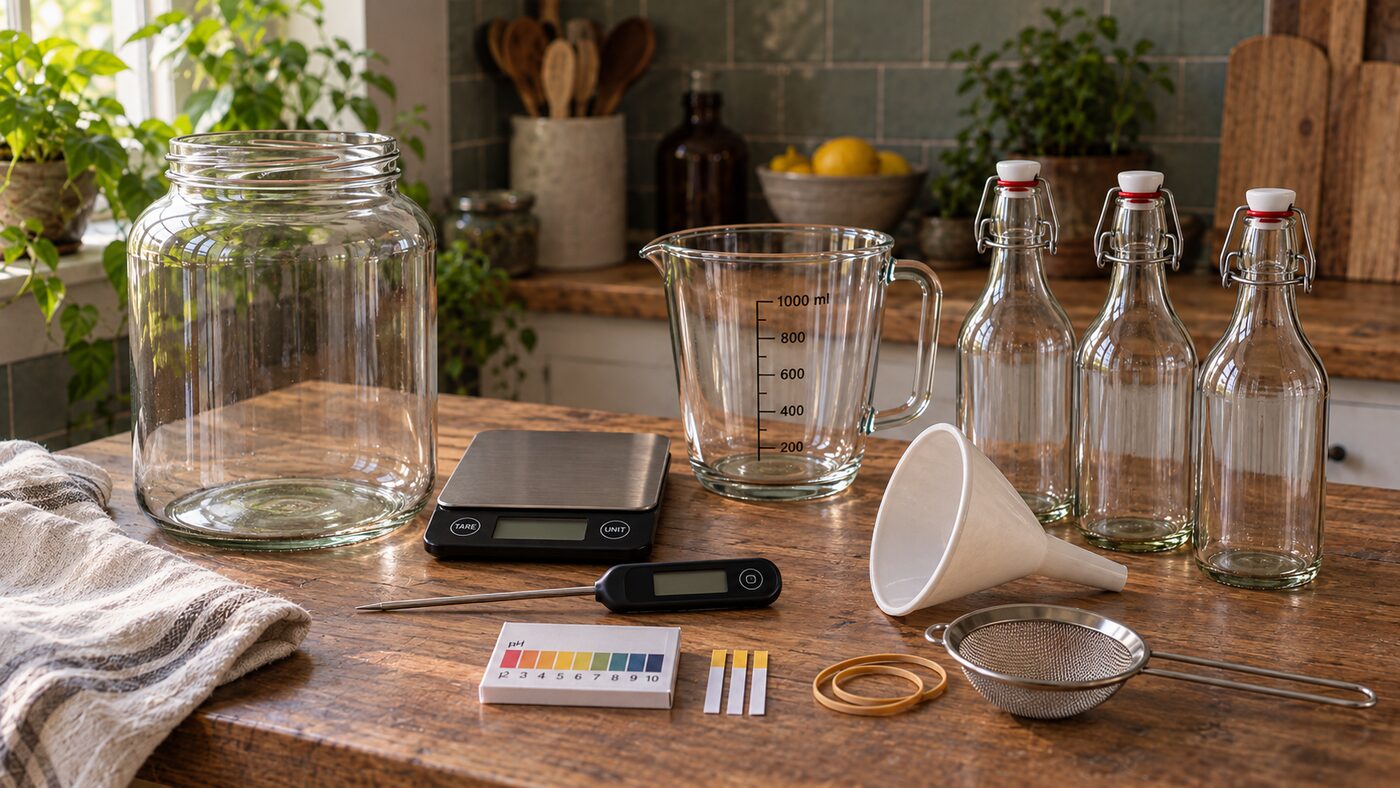
A 2 to 4 liter wide-mouth glass jar, a tightly woven cloth with a band, a pot for the tea, and pressure-safe bottles are the whole kit. Everything else is optional. Glass or food-grade stainless steel for the jar; no reactive metal, no unknown ceramic glaze, and no lid during the first fermentation.
A starter kit is worth it when it includes a fresh culture in at least a cup of strong starter liquid. The jar and the cloth cost less bought separately.
The essentials
| Item | What to look for | Avoid |
|---|---|---|
| Brewing jar | 2–4 liters, glass, wide mouth so the culture has surface area and you can reach in | Narrow jars, crystal (lead), ceramic with an unknown glaze, anything with a metal lid touching the brew |
| Cover | Tightly woven cotton, a coffee filter, or paper towel, held with a rubber band | Loose cheesecloth (fruit flies get through), airtight lids |
| Pot or kettle | Anything you boil water in; stainless steel is ideal | Nothing special needed; the culture never touches it |
| Measuring | A kitchen scale for tea and sugar; a measuring jug for water and starter | Guessing. Ratios matter more than any gadget |
| Bottles | Thick, round swing-top bottles made for carbonated drinks, or rinsed commercial kombucha or beer bottles | Square or decorative bottles, thin glass, jars with screw lids, corks |
| Utensils | A wooden or stainless spoon, a funnel, a fine strainer | Prolonged contact with aluminium, copper or brass |
Bought new, the whole list comes to the price of a few bottles of commercial kombucha, and most of it is already in a kitchen. That is genuinely all a first batch needs, and how to make kombucha uses nothing else. The culture and starter liquid are ingredients rather than equipment, and they matter more than everything on this page combined.
Materials that are safe
Kombucha is acidic, roughly the pH of vinegar, and it sits in the vessel for weeks. That rules out anything that leaches. Glass is the safe default; food-grade stainless steel is fine; food-grade plastic is acceptable for short contact such as bottling and funnels. Ceramic is only safe if you know the glaze is lead-free and rated for food, because public-health reports include cases of lead poisoning from kombucha brewed in glazed crocks. Crystal glass also contains lead. Aluminium, copper and brass react with the acid; if a vessel has a spigot, it should be 304-grade stainless steel or plastic on the inside, never brass, since cheaper chrome- or nickel-plated fittings corrode under the acid and leach metal into the brew.
The FDA’s own test for a glaze is blunt and easy to picture: soak the piece in a 4 percent vinegar solution for 24 hours and measure how much lead comes out. Its limit is 0.5 milligrams of lead per liter for cups, mugs and pitchers, a tenth of the limit for flatware, because a drink sits in a cup far longer than food sits on a plate, which is exactly the situation a kombucha crock creates for weeks at a time.
Bottles
Bottles are the one piece of equipment that can hurt you, because the second fermentation builds pressure. Use bottles designed for carbonated drinks: thick, round, with a swing-top and a replaceable gasket, or reusable commercial kombucha or beer bottles with new caps fitted using the right tool. A plastic soda bottle makes a useful test bottle, since you can squeeze it to feel the pressure. Check gaskets for cracks, leave 2 to 3 cm of headspace, and keep fermenting bottles in a box or cupboard. Second fermentation has the full bottle guide.
Extras that earn their place
- A heat mat or brewing belt, if your kitchen drops below 20 °C in winter. The single most useful upgrade in a cold house.
- pH strips, for peace of mind on a slow batch: below 4.2 within a few days, 2.5 to 3.5 when finished.
- A thermometer, or a stick-on strip for the jar, so “room temperature” becomes a number you can note.
- A second jar for a SCOBY hotel. Spare layers in strong starter are your insurance against a lost batch.
- A fine mesh strainer and a funnel that fits your bottles, for cleaner pouring and flavored bottles.
- A vessel with a spigot, if you want to try continuous brewing. Not before your first few batches.
- Labels or masking tape. Dates and flavors on the bottle beat memory.
Before buying a heat mat, try the free options: the top of the fridge, a cupboard next to a warm wall, or a towel wrapped around the jar. Many kitchens have a spot that sits at 22 °C all winter; a thermometer finds it.
Cleaning and caring for it
- Wash the jar between batches with hot soapy water and rinse until it no longer smells of soap. Every few batches, a rinse with white vinegar removes yeast film.
- Never use antibacterial or bleach-based cleaners on anything that meets the culture; residues linger and the acidity does not need them.
- Wash cloth covers with the laundry and keep a spare. A cover that smells of vinegar is fine; one with spots is not.
- Take swing-top bottles apart when you wash them: the gasket and the cap groove trap yeast. Replace gaskets that have gone stiff or cracked.
- Dry everything before storing it. A damp jar in a cupboard grows the one thing you do not want near your culture.
Brewing more
Once a routine works, most people want more kombucha than a 2 liter jar gives. Two options. Several jars of the same size, which keep batches independent and let you run different teas or flavors side by side; or one large vessel of 5 to 10 liters, ideally with a spigot, which is the continuous brew route. Bigger jars need a wider surface rather than more depth, because the culture works at the top, and they take a day or two longer to ferment. Whatever you scale to, the ratio stays the same: 5 g of tea, 60 to 70 g of sugar and 100 to 200 ml of starter per liter.
What to skip
- Sterilising chemicals. Hot soapy water and a good rinse are what kombucha needs; the acidity does the rest, and residues harm the culture.
- Special water. Filtered or boiled tap water is fine unless your supply is heavily chlorinated or very soft.
- Dehydrated cultures. They fail often and take several batches to recover. A fresh culture in liquid is worth the extra cost.
- Kits with only a tiny sachet of starter liquid. Check that the kit supplies enough clearly sour starter for the volume it asks you to brew; no fixed amount makes every batch safe.
- Expensive pH meters and hydrometers. Strips are enough for pH, and hydrometers do not read kombucha correctly.
- Anything with brass fittings or an unknown glaze, however handsome.
Is a starter kit worth it?
Kits vary from a culture in a bag to a boxed set with jar, cloth, tea, sugar and bottles. Judge them on the culture: a fresh, pale SCOBY submerged in at least 250 ml of clearly sour starter liquid is what you are paying for, and a good kit ships it that way and says so. Everything else in the box is convenient rather than necessary, and often costs less bought separately. A kit makes sense if you have no brewer nearby to give you a culture and do not want to spend three weeks growing one from a bottle; what a SCOBY is compares the routes. Whatever you buy, read the reviews for how the culture arrived, not how the jar looked.
Frequently asked questions
Can I use a plastic bucket or container?
For a batch or two, if it is food grade, yes. Glass is better for anything longer: it does not scratch, stain, or absorb flavors, and it lets you see the surface.
Do I need a vessel with a spigot?
No. A spigot only makes sense for continuous brewing. For batch brewing it is one more part to clean and one more place for yeast to clog.
Can I cool the tea in a metal pot?
Yes. Stainless steel is fine for making and cooling the sweet tea; the culture only meets the liquid once it is in the jar.
What size jar should I start with?
Two to four liters. Big enough to learn from, small enough to throw away without regret if a first batch goes wrong. Scale up once you know your routine.
Do I need to sterilise everything?
No, clean is enough. Wash with hot soapy water, rinse well, and let it dry. Kombucha’s acidity protects it far better than any sterilising step would.
What bottle size is best?
330 to 500 ml. Small bottles carbonate evenly, chill quickly, and are one serving, so nothing sits open going flat. Liter bottles are fine for plain kombucha you will finish in a day or two.
Can I use a jar with a metal screw lid?
For the first fermentation, yes, as long as you use cloth instead of the lid; the culture never touches the metal. For storing finished kombucha, a screw-lid jar is fine in the fridge. Never use one for the second fermentation: it will not hold pressure safely.
Sources
The guidance above draws on these references. Health and safety points are conservative on purpose: home brewing has real variability, and no article can check your batch for you.
These guides were drafted with AI assistance and reviewed by a hobby home kombucha brewer.
- Colorado State University Extension: Understanding and Making Kombucha
- BC Centre for Disease Control: Safety of Fermented Foods, section 3.11 Kombucha and Jun (2024)
- Cultures for Health: Kombucha brewing vessels and continuous brewing containers
- Craft a Brew: Kombucha bottle bombs explained
- FDA: CPG Sec. 545.450 Pottery (Ceramics); Import and Domestic, Lead Contamination